Showing posts with label CANDY RECIPES. Show all posts

Thursday, 5 September 2013

EASY HONEY-MAPLE CANDIED NUTS

This QUICK and EASY recipe is a one of those NO FAIL treats that is good for your family; even picky-picky husband adores this recipe.


BULK nuts in the nutrition department of your grocery store, save money and work wonderfully for this recipe. They sell salted and Unsalted. I suggest you use the Unsalted nuts if you can find them.  If you can not find Unsalted nuts, just don't add any salt to the honey mixture.

You will need a large cookie sheet for this recipe; line it with foil and put it in the oven while you are pre-heating it (just to get it nice and warm). PRE-HEAT oven to 350°.
 

1  pound UNsalted nuts
2 tablespoons honey
1½ tablespoons real maple syrup (not pancake syrup)
1½ tablespoons unsalted butter
1 teaspoon kosher salt
1 teaspoon vanilla extract
2 tablespoons granulated sugar
3/4 teaspoons kosher salt

In a small glass bowl, mix the honey, maple syrup, butter and 1 teaspoon kosher salt. Heat until the butter is melted and there are a few bubbles around the edges of the bowl.

Drizzle the honey-syrup mixture over the nuts, using a rubber spatula to get every last drop out of the bowl.Gently toss the nuts until they are completely covered.

Take the foil lined cookie sheet out of the oven (it should be nice and hot) and spread the honey coated nuts out in a single thickness (do not grease the foil).

Bake at 350° for 6 minutes.  After 6 minutes, remove the nuts and they will look a little "foamy" like this:
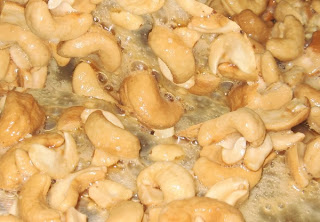
 
Quickly toss or stir the nuts (two spoons work the best for this) and put them back into the oven for another 6 minutes.  During that time mix 2 level tablespoons of granulated sugar and 3/4 teaspoon of kosher salt in a little cup and set aside.

When the nuts come out of the oven for the 2nd time, put them in a large CLEAN bowl and sprinkle them with about 1/3 of the sugar-salt mixture and toss; sprinkle with another 1/3 of the sugar-salt mixture and toss again; gently sprinkle with the last 1/3 and stir.


Spread the nuts onto a large piece of parchment paper or ungreased foil and spread them out as much as possible to cool; any nuts touching each other will try to stick together (but they will easily break apart when they are cooled down).

You are going to be TEMPTED to eat one of these nuts at this stage, but BE CAREFUL, they are molten hot!!

When the nuts are COMPLETELY COOL, put them in a glass jar with an airtight lid; a little jar like this on my computer desk is heaven!!

I'm warning you, these are 
totally addictive!! 
 
NOTE: Make sure the cookie sheets have a raised lip around the edge.


NOTE: There is no OBVIOUS maple flavor to these nuts, but the maple syrup does blend beautifully with the honey and vanilla.

Thursday, 6 October 2011

MAPLE PEANUT BUTTER FUDGE (MICROWAVE)

I found this recipe on one of my favorite recipe pages: The Domestic Mama & The Village Cook. I have found some great recipes over there, and I highly recommend their recipe blog.

This quick and easy microwave fudge is totally addicting. I made it the other day and our company went nuts for it (I have to admit that Picky-Picky Hubby and I ate our share as well). The unlikely maple-peanut butter combo is fantastic; not quite peanut butter, not quite maple, hint of butterscotch maybe?

8 ounces salted butter
1 cup creamy peanut butter
1 pound of powdered sugar
¼ teaspoon salt
1½ teaspoons maple extract
1 teaspoon vanilla extract

Line an 8" x 8" buttered pan with parchment paper so that the parchment overhangs enough to fold over, once the pan is filled (I didn't butter the pan).

Place the butter and peanut butter in a large (microwave safe) bowl; cover with plastic wrap. Microwave on high for 2 minutes (cut the butter into cubes and mix it into the peanut butter so that it all melts evenly).

Remove the bowl from the microwave (carefully, it is hot), and stir. Re-cover and microwave for (an additional) 2 minutes. Remove from microwave (careful, it is really hot) (watch for hot steam when you remove plastic).

Add the extracts and powdered sugar and stir with wooden spoon (I used my stand mixer). Press into prepared pan and press down until flat and compact. Cover the top of the fudge with extra parchment paper. Place in fridge for 2 to 4 hours.  Bring to room temperature before you try to slice this fudge. I didn't butter the pan, so I had to run a thin knife around the edges before I lifted the fudge out of the pan by using the parchment paper "handles".

Store in air tight container at room temperature. I didn't put mine in an air tight container, I just left it in a bowl with loose fitting lid.

NOTE: If the fudge seems "crumbly" while it is still hot, don't worry about it. Just press it tightly into the prepared pan and when it chills, it will look just like the photo. Eight ounces of butter seems like a lot, but I can guarantee you the fudge does NOT taste greasy at all, it is excellent.

Saturday, 11 December 2010

EASY MICROWAVE CANDY

This is the easiest candy I have ever made and better yet, my picky Hubby gives it two thumbs up!! It is fast to make in the microwave and is pretty enough for Christmas gift giving.

12 ounce bag of good quality white chocolate chips
12 ounce bag of good quality semi-sweet chocolate chips
12 ounce bag of good quality milk chocolate chips
3 cups of your favorite whole nuts (see note)
.
Put the chocolate chips in a large, microwave safe glass bowl and microwave for two minutes at 60% power (imperative that you stir every 30 seconds). My microwave took about 2 minutes and 10 seconds.
.
Stir until all of the chocolate is smooth, then stir in 3 cups of your favorite whole nuts. I ended up adding five cups of whole mixed nuts and I'm fairly certain I could have added one more cup. This makes a LOT of candy!!
.
The recipe calls for spooning candies onto waxed paper, but I spooned mine into mini-cupcake size paper liners. Put them in the fridge to "set" for about 15 minutes and they are ready to serve.
.
NOTE: The candy will only be as good as the chocolate you use. I used Ghirardelli chocolate chips. (Note: You do not taste the white chocolate when they are all melted together (I don't like white chocolate), but the blend of the 3 chocolates is excellent.
.
NOTE: I used a mixture of whole roasted nuts (cashews, almonds, peanuts, pecans, Brazil nuts and hazelnuts...delicious.

Sunday, 14 November 2010

PEANUT BUTTER BON BON's

Today is our 40th Wedding Anniversary, where have all the years gone? We are celebrating quietly at home, with shrimp cocktail, filet mignon, cherry pie and these little peanut butter beauties!!
They are very easy to make and totally addicting. The filling was adapted from a recipe called Buckeye's, but I changed it a little bit...made them much smaller and completely covered them with chocolate, then decorated with a little white drizzle. These will be wonderful for any holiday gathering.
.
1½ cups creamy peanut butter
½ cup butter (room temperature)
1 teaspoon vanilla extract
4 cups powdered sugar (sifted into a cup)6 ounces semi-sweet chocolate chips
2 tablespoons shortening
.
Mix the peanut butter, butter, vanilla and powdered sugar with a stand mixer (or your hands) until you get a smooth dough (to measure sugar, sift it into a measuring cup and level it off with a straight edge).
.
Shape the dough into 1" balls and set them on a wax paper lined cookie sheet and put them in the freezer for about an hour.
.
In a double boiler, melt shortening and chocolate together over barely simmering heat. Remove balls from freezer (just about a dozen at a time) & poke a tooth pick into the top of a chilled dough ball (to use as a handle) and dip into chocolate, then sit on a wax paper lined tray & put in fridge (leave the toothpick in the candy until it's chilled again, it is easier to remove that way). Continue until all of the candies are coated (makes about 50 depending on how large you make them.

The chocolate will set (be dry to the touch) after about 10 minutes in the fridge. Remove from fridge, take out the toothpick and cover up the little toothpick hole with more chocolate. You can cover the little hole with chocolate or white chocolate.

These need to be kept in the fridge until you are ready to serve them. I dare you to eat just one!!

Thursday, 22 October 2009

DULCE de LECHE (Made in the crockpot!!)

Yes, you heard me right, dulce de leche made in the crockpot!! The first time I tried it, I was very skeptical, but it works like a charm and couldn't be easier.

Fill crockpot with COLD water. Put an UNOPENED can (with paper label removed) of sweetened condensed milk (not evaporated milk) into the cold water, making sure that the water is 2" taller than the can. If you are doing more than one can, make sure there is at least 2" of space BETWEEN each can as well. 

Put the lid on the crockpot and let it "cook" on LOW for EIGHT hours. Take the cans out of the crockpot and dry them off and label them. If you are going to use them right away, let them cool down a couple hours before you try to open the can. Cooled and unopened cans can be kept in the pantry like you would any other canned item.


DISCLAIMER: people that make Eagle Brand Sweetened Condensed Milk never anticipated people heating their product in an unopened can. As a matter of fact, I'm sure they would disapprove, so please, if you try this method, use common sense caution....but it has worked VERY WELL for me and for many other people I know. 


Crockpot Dulce de Leche
Right after opening the can; it is unbelievably delicious!!
 
NOTE: One friend that had a white crockpot, said that the can left a permanent "ring" on the bottom of her crockpot; I didn't have that problem. If you are concerned, put a layer of paper towels under the can/cans before you add the cold water.

Wednesday, 8 July 2009

MICROWAVE PEANUT BRITTLE

This recipe makes a big pan of peanut brittle right in your microwave; no candy thermometer and almost no stirring. The hardest part of this recipe is figuring out what wattage your microwave is (so you can adjust the cooking time). Be careful though, this candy is highly addictive and best of all, it doesn't stick to your teeth like a lot of brittle's do!

I'll give you the ingredients first, and then talk about microwaves and cooking times:
1 cup white sugar
1/2 cup light corn syrup (like Karo)
1 cup salted peanuts
1 teaspoon butter
1 teaspoon vanilla extract
2 level teaspoons baking soda

Prepare everything you need before you start the microwave. Spray a cookie sheet with cooking spray (see note below), measure out the nuts, butter, vanilla and baking soda, set it all within arms reach.

Basic instructions are: In a 2 & 1/2 quart microwave safe bowl, mix the sugar and corn syrup until all of the sugar is moist. Microwave on high for xxx minutes, remove from microwave and quickly stir in the peanuts. Microwave on high for xxx minutes, remove and stir in butter and vanilla. Microwave on high for xxx minutes and remove for the last time. Stir in the baking soda. It will foam up; try and distribute the baking soda with as few strokes as possible since every stroke (after it foams up) will reduce the number of air bubbles (air bubbles = good candy). Pour the hot candy out onto a prepared cookie sheet and TILT the cookie sheet to help the hot candy to "move" (don't use a utensil here...just tilt the pan). Be careful, this candy (and the pan you tilt) are going to be hotter than blazes, so be careful. When candy is at room temperature (it's going to take a while), break into pieces.

The following directions were written for a 900 watt microwave:
Microwave on high 4 minutes, add peanuts, microwave on high for 3 & 1/2 minutes, stir in butter and vanilla microwave 1 & 1/2 minutes. Remove and add baking soda.

The following directions were written for a 1100 watt microwave"
Microwave on high for 3 minutes 45 seconds, add nuts and microwave for 2 minutes and 45 seconds, add vanilla and butter and microwave for 30 seconds. Remove and add baking soda.

The following directions are for a 1500 watt microwave. This is the only one I can vouch for, since my microwave is 1500 watts. Three minutes on high, add peanuts, microwave on high 3 more minutes, add butter and vanilla and microwave on high 1 minute, remove and stir in baking soda.

NOTE: The original recipe said to grease a cookie sheet. I've done that with other brittle recipes, and it gives the back side of your candy a greasy feel. If you pour the hot candy onto parchment paper lined cookie sheet, it will pop right off of the paper when it cools.

NOTE: It is good (but not necessary) to warm up the peanuts a little before you add them.

NOTE: Don't even TRY to wash the bowl and utensils by hand, just throw them in the dishwasher and they will come out clean.

NOTE: The first time you make this peanut brittle, keep an eye on the candy (as it cooks). You are going for a nice golden color, not a golden brown.

NOTE: Store finished candy in an air tight container (or it will get sticky).

Wednesday, 27 May 2009

PEANUT BUTTER CANDY (sort of like a Pay Day candy bar)

If you like Pay Day candy bars, you will love this recipe. It tastes very similar, but SO much fresher and better. This recipe makes a 9 x 13 pan of candy, which would be an excellent addition to your children's birthday party menu! They take just a few minutes to put together and then an hour or so in the fridge, to "set".
4 cups honey roasted peanuts
(1) 10½ ounce bag miniature marshmallows
1/2 cup butter (melted)
(1) 14 ounce can sweetened condensed milk (not evaporated)
(1) 10 ounce bag peanut butter chips
1/2 cup peanut butter

Line a 9 x 13 dish with foil and spray it with cooking spray (I spray my foil with cooking spray then blot it with a paper towel so it doesn't make the candy greasy). Set aside.

In a large (heavy bottomed) saucepan, mix the marshmallows and melted butter. Heat over medium-low heat until completely melted (you do not want the marshmallows to boil, but you want to see a little bubble now and then). Keep it at this temperature for about a minute. Stir in the sweetened condensed milk, peanut butter chips and peanut butter. Stir until everything is melted and smooth.

Pour this mixture over the peanuts in the pan and spread out evenly. Sprinkle the other half of the peanuts over the hot mixture and press the nuts into the surface of the hot mixture (with your hand). Chill in the fridge for 1-2 hours or until firm. Cut into pieces and serve. Store covered in fridge. Makes 60 pieces of candy.