Showing posts with label BAKE SALE RECIPES. Show all posts

Thursday, 5 September 2013

EASY HONEY-MAPLE CANDIED NUTS

This QUICK and EASY recipe is a one of those NO FAIL treats that is good for your family; even picky-picky husband adores this recipe.


BULK nuts in the nutrition department of your grocery store, save money and work wonderfully for this recipe. They sell salted and Unsalted. I suggest you use the Unsalted nuts if you can find them.  If you can not find Unsalted nuts, just don't add any salt to the honey mixture.

You will need a large cookie sheet for this recipe; line it with foil and put it in the oven while you are pre-heating it (just to get it nice and warm). PRE-HEAT oven to 350°.
 

1  pound UNsalted nuts
2 tablespoons honey
1½ tablespoons real maple syrup (not pancake syrup)
1½ tablespoons unsalted butter
1 teaspoon kosher salt
1 teaspoon vanilla extract
2 tablespoons granulated sugar
3/4 teaspoons kosher salt

In a small glass bowl, mix the honey, maple syrup, butter and 1 teaspoon kosher salt. Heat until the butter is melted and there are a few bubbles around the edges of the bowl.

Drizzle the honey-syrup mixture over the nuts, using a rubber spatula to get every last drop out of the bowl.Gently toss the nuts until they are completely covered.

Take the foil lined cookie sheet out of the oven (it should be nice and hot) and spread the honey coated nuts out in a single thickness (do not grease the foil).

Bake at 350° for 6 minutes.  After 6 minutes, remove the nuts and they will look a little "foamy" like this:
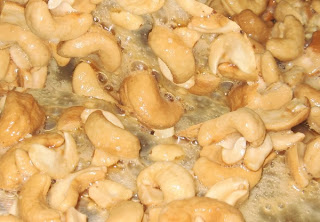
 
Quickly toss or stir the nuts (two spoons work the best for this) and put them back into the oven for another 6 minutes.  During that time mix 2 level tablespoons of granulated sugar and 3/4 teaspoon of kosher salt in a little cup and set aside.

When the nuts come out of the oven for the 2nd time, put them in a large CLEAN bowl and sprinkle them with about 1/3 of the sugar-salt mixture and toss; sprinkle with another 1/3 of the sugar-salt mixture and toss again; gently sprinkle with the last 1/3 and stir.


Spread the nuts onto a large piece of parchment paper or ungreased foil and spread them out as much as possible to cool; any nuts touching each other will try to stick together (but they will easily break apart when they are cooled down).

You are going to be TEMPTED to eat one of these nuts at this stage, but BE CAREFUL, they are molten hot!!

When the nuts are COMPLETELY COOL, put them in a glass jar with an airtight lid; a little jar like this on my computer desk is heaven!!

I'm warning you, these are 
totally addictive!! 
 
NOTE: Make sure the cookie sheets have a raised lip around the edge.


NOTE: There is no OBVIOUS maple flavor to these nuts, but the maple syrup does blend beautifully with the honey and vanilla.

Saturday, 10 August 2013

LUNCH BOX APPLE-PUMPKIN MUFFINS

School lunches are right around the corner,
and these muffins are SUPER moist (they taste even better on day two and three as long as you keep them covered well) AND they are packed with flavor!!

Make a batch of these for  school lunches, or a bake sale or share them at work. You will love this muffin!!!

 This recipe goes together quickly and easily and the muffins bake up with nice round tops covered with a sweet streusel topping. Makes 18 muffins. I don't even use a mixer for this recipe, just a hand whisk works well.

2 1/2 cups flour
2 cups white sugar
2 teaspoons cinnamon (see substitution note below)
1/2 teaspoon ground ginger
1/2 teaspoon ground nutmeg
1 teaspoon baking soda
1/2 teaspoon salt
2 eggs slightly beaten
(1) 15 ounce can of pumpkin
1/2 cup canola oil
2 cups cooking apples (peeled and chopped small)

Preheat oven to 350°. In large bowl, mix dry ingredients until well combined, set aside.

In another bowl, whisk all of the wet ingredients until smooth, then stir in the chopped apples by hand. 

Mix the bowl of wet ingredients into the bowl of dry ingredients. Spoon batter equally into paper lined cupcake pans. Top with streusel topping (optional) (recipe below) and bake for 35-40 minutes at 350°.

Muffins are done when toothpick inserted in center comes out clean.

STREUSEL TOPPING   (optional)
2 tablespoons flour
¼ cup white sugar
½ teaspoon cinnamon
4 teaspoons melted butter

Mix streusel ingredients with your fingers until you get a dry crumbly topping. Put a little on each muffin before you bake.

NOTE: You can substitute 1 tablespoon pumpkin pie spice for the cinnamon-ginger-nutmeg combination.

NOTE: Let muffins cool down a little, but before they are entirely cold, cover with plastic wrap. Muffins should be stored covered.

NOTE: Recipe says to bake for 35-40 minutes. My oven cooked these in 35 minutes exactly.

Tuesday, 9 April 2013

BEST PUMPKIN BARS EVER !!! (Plus)

I've made pumpkin desserts for many more years than I care to count: pumpkin bread, pumpkin cake, pumpkin muffins, pumpkin pie, pumpkin bars, etc., etc., but today's recipe for super moist pumpkin bars is BY FAR THE BEST pumpkin recipe I've EVER tried !!!

They are light as air; they taste like pumpkin pie and they are SUPER, SUPER moist; they are totally addicting!! Since this recipe makes a large 10" x 15" pan, they would be excellent for a potluck, bake sale or weekend crowd. However if you are like us, and a 10" x 15" is just too much, check out the mini-version of this recipe at the bottom of this post.


4 large eggs
1 2/3 cup granulated sugar
1 cup vegetable oil
15 ounce can of pumpkin puree(see note)
2 cups all purpose flour
2 teaspoons baking powder
1 teaspoon baking soda
2 teaspoons ground cinnamon
1/2 teaspoon ground ginger
1/4 teaspoon ground cloves
1 teaspoon salt

This is super easy to make, just put the eggs, sugar, oil, pumpkin and spices in a large bow and mix with electric mixer until it gets nice and light (just takes about 30 seconds, but it is an important step).

Next add everything else, and mix until it is well combine, but don't over mix. I do this step with a  hand whisk.

Spread it into a lightly greased 10"x15" jellyroll pan and bake at 350°F for 25-30 minutes or until it springs back when lightly pressed. Cool completely before frosting.

FROSTING
8 ounces of cream cheese (room temperature)
1 cup butter (room temperature)
2 teaspoon vanilla extract
4 cups powdered sugar

Cream the cheese and butter together, add the sugar and vanilla and beat until smooth. Spread evenly on cooled bars. If frosting seems too thick, add milk (1 tablespoon at a time) until you get the consistency you like.

Here's the Mini-recipe:

A 10"x15" pan is just way to big for us empty-nesters, so here is a reduced size that fits perfectly in an 8"x4" loaf pan. I remove it from the loaf pan, frost it and then slice it (I get about eight 4" x 2" pumpkin bars out of this recipe).


1 egg
1/3 + 1 tablespoon + 1 teaspoon sugar
1/4 cup vegetable oil
1/2 cup pumpkin puree
1/2 teaspoon ground cinnamon
1/8 teaspoon ground ginger
pinch of ground cloves
1/4 teaspoon salt
1/2 cup flour
1/2  teaspoon baking powder
1/4  teaspoon baking soda

Follow same directions as above except use an 8"x4" loaf pan. I lined the bottom with parchment so I could just lift the bars out of the pan after cooking (for easy slicing). Bake at 350 for 25-30 minutes (my electric oven takes 30 minutes). Let cool completely then slice into bars.

FROSTING
I used half of the above frosting recipe because we like a lot of frosting. 

NOTE: Make sure you use plain old pumpkin puree, not the kind of canned pumpkin that already has spices in it. If you want to use the kind with the spices already in it, just reduce the spices in the recipe.

Sunday, 27 January 2013

BUTTER COOKIES

These big 4" cookies are crispy, light as a feather and full of butter-y goodness. They are too fragile to ship through the mail, but straight out of the cookie jar, they are melt in your mouth perfection.

1 1/4 cups butter (room temperature)
1 1/2 cups granulated sugar
3 egg YOLKS
2 cups all purpose flour
1 teaspoon baking soda
1 teaspoon cream of tartar
1 TABLESPOON of vanilla extract

Cream the room temperature butter and granulated sugar with your stand mixer. Once smooth, add the egg yolks, one at a time, and beat well in between each addition; beat in the vanilla.

Mix the flour, baking soda and cream of tartar, and add this mixture to the butter mixture, one cup at a time. Mix well.

Cover and chill the dough for about 30  minutes.

Roll the dough into 1" balls and roll them in granulated sugar.  Place on an UNgreased cookie sheet (3" apart)and flatten slightly.

Bake in 350° preheated oven for 10-12 minutes or until the edges of the cookies are golden.  Recipe makes 3½ dozen cookies.

Rolling dough into 1" balls, will give you 4" cookies, so leave lots of room between each cookie ball on the cookie sheet.


Tuesday, 15 January 2013

PEANUT BUTTER SNACK CAKE

Are you old enough to remember the snack cake craze? Simple sweet cakes made for no special occasion, other than to just "snack on"; they were great. I don't  know when, or why, they faded from the scene, but I've decided to bring them back into my kitchen as a welcome change from the ever present cookie jar. Peanut butter cake, studded with mini-chocolate chips and frosted with a peanut butter and honey frosting...what's not to love?!
This cake is delicious and, if kept covered, stays moist for several days. The recipe ingredients listed here are for a 10" round cake, but you can double the ingredients and bake it in a 9"x13" pan as well.

1 cup all purpose flour
1 cup brown sugar (packed)
1/2 cup peanut butter
1/4 cup butter (room temperature)
1 teaspoon baking powder
1/2 teaspoon baking soda
1/2 cup milk
1 teaspoon vanilla
2 eggs
1/2 cup semi-sweet mini-chocolate chips

In the bowl of an electric mixer, beat the flour, sugar, peanut butter and butter until it is crumbly.

Add the rest of the ingredients (except the chocolate chips) and mix on low speed until everything is well combined, then mix on med-high speed for three minutes.

Dust the mini-chocolate chips with a tablespoon of flour and then shake off the excess (this will keep them from sinking in the batter as they bake). Stir chips into the batter.

Bake in a greased and floured 10" round pan at 350° fir 35-40 minutes or until toothpick tests clean (my electric oven took 35 minutes).

Cool in the pan for 10 minutes then turn out onto serving plate.
FROST THIS CAKE WHILE STILL HOT!!

PEANUT BUTTER AND HONEY FROSTING
1/2 cup peanut butter
2 tablespoons honey
1 teaspoon vanilla extract
2 cups powdered sugar
4 to 5 tablespoons milk
Warm the peanut butter and honey in the microwave until it is soft but not melted. Add the rest of the ingredients and beat with electric mixer until smooth and creamy.  FROST CAKE WHILE STILL HOT.

NOTE:  If you double this recipe for a 9"x13" cake, 
make sure you double the frosting as well.


Friday, 11 January 2013

CHEWY MOLASSES COOKIES

One of our baby boys turns 36 today, where have the years gone!?!? I made him a batch of these wonderfully soft and warmly spiced molasses cookies to go along with his birthday gift.

3/4 cup butter (room temperature)
1 cup brown sugar (packed)
1 egg
1/4 cup molasses
2 cups all purpose flour
1 teaspoon baking soda
1/4 teaspoon salt
1 teaspoon ground cinnamon
1/2 teaspoon ground cloves
1/2 teaspoon ground ginger

In the bowl of an electric mixer, combine the room temperature butter, brown sugar, egg and molasses; mix until smooth, scraping the sides of the bowl if necessary.

Add the flour, baking soda, salt and spices and mix well.  Cover and chill the dough for about an hour.

Roll the dough into balls about the size of a small walnut and roll them in granulated sugar. Place them on an ungreased cookie sheet (about 2" apart) and flatten them just a little. 

Bake at 375° for 8 minutes (the tops will have a wonderful crackle look). Be careful not to over bake them.  The cookie batter (inside of the cracks) will still look a little "wet" after 8 minutes in the oven, but they will be perfectly baked and chewy when they cool off.  If you like a crisp cookie instead of a chewy cookie, leave them in the oven for another minute or so.

To keep these cookies soft and chewy, store them in a Ziploc bag or any Tupperware that has a tight fitting lid. These cookies freeze (and ship) very well and they smell heavenly when you open the cookie jar!!!

We have two awesome sons, Kevin (the birthday boy) is 36 today and Kris will be 41 in a couple of months. Seemingly overnight, they have grown into wonderful men that I thank God for every day; they have also blessed us with four PERFECT grandchildren.
 Happy Birthday Kevin, we love you!!

Friday, 30 November 2012

EASY THIN MINT COOKIES

Do you like Girl Scout thin mint cookies as much as I do? If so, you are in luck with this super easy, super quick, two ingredient recipe.  It is so easy, I can't even say it is a "recipe" because it uses all pre-prepared ingredients and it DOES taste JUST LIKE a thin mint cookie!!  I'm including these in my Christmas cookie trays this year.


I put a little extra white chocolate decoration on these, just for fun,
but it certainly isn't necessary.

You will need some Nabisco Famous Chocolate Wafers and some Andes (creme de menthe) chocolates.....that's it!!
The chocolate wafers come in a 9 ounce package and I found the Andes mints (those creamy little chocolate mints with the green center) in a 4.67 ounce package.  There are 28 mints in the package and one package will do a dozen cookies (I found the mint packages for $1.60 here in Alaska, so hopefully you can find them even cheaper.

I unwrapped and then melted the chocolates in my microwave for about 30 seconds...stirred and then microwaved them for another 10 seconds (stir until the chocolate is smooth and shiny). Dip the chocolate wafers in the melted chocolate (both sides) and place on some parchment paper (or Silpat). Stick them in the fridge (I used the freezer) for about 5 minutes to "set" the chocolate......that's it!!  

It is truly amazing how much they taste like a thin mint!! 


Wednesday, 31 October 2012

PUMPKIN SPICE CUPCAKES

This is a wonderful recipe for several reasons: the cupcakes are super moist and tender, they are mildly spiced and the batter goes together with one bowl and a whisk; what could be easier? They are so tasty, that they really don't need a frosting, although I like to serve them frosted with a simple maple flavored butter cream (pumpkin and maple are MADE for each other). Everyone loves these simple cupcakes!!

In a large bowl, mix together with a whisk:

(1)  15 ounce can of pumpkin (not pie filling)
1 2/3  cup of granulated sugar
1 cup vegetable oil
4 eggs
2 teaspoons ground cinnamon
(scant) 1/2 teaspoon ground cloves
(scant) 1/4 teaspoon ground nutmeg

Whisk together until very well mixed, then add:

2 cups all purpose flour
2 teaspoons baking powder
1 teaspoon baking soda
1 teaspoon salt

Mix well, then stir in 1/2 cup of raisins (optional).

Fill cupcake papers 3/4 full.  Bake in a 350 oven for 23-25 minutes (my electric oven takes 23 minutes) or until toothpick tests clean.  Remove and cool.

After the cupcakes have cooled, dust the tops with powdered sugar or frost with your favorite frosting.


I never measure my "everyday" frosting, but here's a stab at it:

Melt 3 tablespoons butter; add 1 teaspoon vanilla extract and 1/2 teaspoon maple extract.
Add 1 to 1½ cups of powdered sugar and a couple tablespoons of cream.  Whisk till smooth. If it seems a little to dry, add another tablespoon of cream.  If it seems a little too wet, had another spoon of powdered sugar.  

MAKES 24 CUPCAKES

Tuesday, 11 September 2012

PEANUT BUTTER BROWNIES with CHOCOLATE-PEANUT BUTTER FROSTING

We are huge fans of peanut butter and chocolate together, are you? This peanut butter brownie has peanut butter and miniature chocolate chips in the batter and a peanut butter - chocolate frosting on top...oh my, it was good!!!


1½ cups all purpose flour
1 teaspoon baking powder
¼ teaspoon salt
6 tablespoons butter, room temperature
½ cup smooth peanut butter
2/3 cup granulated sugar
2/3 cup brown sugar
3 eggs
1 teaspoon vanilla extract
1 cup miniature semi-sweet chocolate chips

Preheat oven to 350 and spray a 8" x 11" baking dish with vegetable spray.

After you measure the flour, remove a tablespoon of it and toss it with the miniature chocolate chips...set aside (this will keep the chocolate chips from sinking in the batter as they bake).

Cream the peanut butter and room temperature butter until smooth.  Add the sugars, vanilla and eggs and beat until smooth with electric mixer.

Add the flour, baking powder and salt and beat on low until combined (don't over-beat). Stir in the flour coated miniature chocolate chips.

Spread in the prepared baking dish and bake 35-40 minutes. NOTE: At 35 minutes, my brownies looked a little dark, so I just shut the oven off and let them sit in there for another few minutes. Use toothpick to test for done-ness.

Remove from oven and place pan on a cooling rack for 20 minutes or so before frosting. 


If you let these frosted brownies cool completely, they will cut cleanly like this.  

I frosted these with my chocolate - peanut butter frosting...posted HERE

Saturday, 1 September 2012

PEANUT BUTTER CHOCOLATE CHIP COOKIES

Picky picky husband loves anything peanut butter and I love anything chocolate; so I combined two of our favorite recipes and this cookie "was born".  It is a GREAT lunch box or picnic cookie, as they travel well and stay soft if you keep them in a lidded cookie jar.
1/2 cup butter flavored Crisco  (see note below)
1/2 cup creamy peanut butter (I use Jiff)
2 eggs
1 teaspoon vanilla extract
1/2 teaspoon salt
1 teaspoon baking soda
1/2 cup brown sugar
1/2 cup granulated sugar
2 ¼ cups all purpose flour
1/2 cup miniature chocolate chips
1 cup chopped pecans

Cream the butter flavored Crisco, peanut butter, eggs and vanilla until smooth and creamy. Add the sugars and mix well.

Add the flour, salt and baking soda and mix well. Stir in the miniature chocolate chips and pecans.

Roll into balls about the size of a walnut and bake on parchment paper lined baking sheet for 10-12 minutes (at 375 degrees) until they are very light golden around the edges.

They won't look quite "done" in the center, but trust me...they are.

NOTE: Some people freak out about using Crisco in cookies, however, 99.9% of the reports show that there is virtually zero difference between Crisco and butter when it comes to saturated fat, not to mention there is zero cholesterol in Crisco (something you can not say about butter).  Just make sure (for flavor sake) you use butter flavored Crisco.

I have no idea how these cookies turn out if you use all butter... I just know that in classic chocolate chip cookies, you get a super thin misshapen cookie if you use butter... but if you use butter flavored Crisco in that same recipe, you get a nice thick, perfectly round cookie.

NOTE: I like to use miniature chocolate chips in my cookies because they distribute in the batter well, however, regular size chocolate chips would work too.

Tuesday, 10 July 2012

EASY BUTTERSCOTCH CANDY BARS

This delicious recipe (posted by Ellen b. over at MGCC) was originally a cookie bar; but you know me, I can't leave a recipe alone, so I doubled the topping ingredients and the end result was almost like a candy bar. I served them at a BBQ, recently, and they were inhaled by kids and adults alike. They are SO easy to make, but a warning here... they are totally addicting!!

COOKIE BASE (original version)
1½ cups all purpose flour
¼ teaspoon salt
½ cup butter (room temperature)
¾ cup brown sugar

Mix the flour, salt and brown sugar, then cut the room temperature butter into the mixture. To do this, I used my stand mixer with a wire whisk on medium high and it gave me fine crumbs like this, which is perfect. Put the crumbs into a 9 x 13 baking dish that has been sprayed with vegetable spray.
Level the crumbs out with your fingers and then pat them down evenly. I used the bottom of a smooth  measuring cup to tamp down the crumbs, which produced a nice flat layer like this:
Bake in a preheated 350F oven for 15 minutes.

While the cookie base is baking, mix the following ingredients in a microwave safe bowl:

BUTTERSCOTCH TOPPING (my version)
12 ounces of butterscotch baking chips
½ cup light corn syrup (I use  Karo syrup)
4 tablespoons butter
2 tablespoons water
¼ teaspoon salt

Melt the above ingredients in the microwave, stirring every 30 seconds (my microwave took about 75 seconds). When the mixture is completely smooth, add two cups of coarsely chopped (and toasted) pecans.

After the cookie base has baked for 15 minutes, remove from the oven and spread the butterscotch-pecan mixture over the top and put back in the oven for another 8 minutes.

Cool completely before slicing.
Store in lightly covered cookie jar.

Thank you for sharing the original recipe Ellen b.

Thursday, 19 January 2012

PEANUT BUTTER KRISPIE TREATS

This recipe has been around forever; it is one of those classic sweet treats from our childhood.  Picky-picky husband is a big fan of the old fashioned Rice Krispie treats made with melted marshmallows, so he initially resisted this peanut butter version (he resists change).  However, this evening, I noticed that the pan of treats, on the kitchen counter, had been seriously noshed upon.

This recipe is SUPER easy and uses all pantry ingredients, which is a good thing.  It goes together in just minutes (the longest part of this recipe is the cool down time). They cut beautifully if you let them cool all the way down and they travel well.

1 cup light Karo syrup
1 cup granulated sugar
1 cup peanut butter
6 cups Rice Krispie cereal
1 cup semi-sweet chocolate chips
1 cup peanut butter chips (see note)

Mix the syrup and granulated sugar in a heavy saucepan, over medium heat (stirring). Bring to a boil and immediately remove from heat; stir in peanut butter until smooth and well mixed.

Pour over Rice Krispie cereal and stir to coat evenly.  Press into a lightly greased 11" x 7" pan (see note) and press down evenly with slightly damp hands.

Melt the chocolate chips and stir until smooth (I melted mine in my microwave at 60% power for about 1½ minutes).  Spread evenly over bars.  Cool about an hour before cutting.

NOTE: This recipe calls for half semi-sweet chocolate chips and half peanut butter chips, but any combo would work well.  I found a similar recipe that used half semi-sweet chocolate chips and half butterscotch chips for the frosting (they called them Scotcheroo's).
NOTE: The size of the pan is not really important. Just remember that the smaller the pan is, the thicker the treats will be and the bigger the pan is the thinner they will be.

Thursday, 3 November 2011

PECAN PIE BARS

Picky-picky Hubby says these pecan pie bars are totally addictive. They have a buttery shortbread crust and a nutty (and slightly gooey) baked topping with a great pecan pie taste.

I have to admit that my budget doesn't allow pecans right now (they are almost $10 for a 2 cup bag!!), so I use walnuts, but they are ever so tasty just the same!! I am planning on adding these to my Christmas cookie trays (I'll splurge on pecans for Christmas though).

CRUST
2 cups all purpose flour
1/3 cup sugar
¼ teaspoon salt
2/3 cup butter (room temperature)

Mix the above crust ingredients and press into a 9" x 13" baking dish (see note below about greasing pan). This mixture will seem crumbly, but don't worry about that. Just pat it evenly into the pan.  Bake in preheated 350 oven for 20 minutes. While the crust is baking, mix up the topping:

TOPPING
3 eggs well beaten
1 cup light corn syrup (like Karo syrup)
½ cup granulated sugar
½ cup brown sugar
2 tablespoons melted butter
1 teaspoon vanilla
1 + 2/3 cup chopped pecans (toasted a little)

Mix well and pour over partially baked crust, making sure the nuts are evenly spread. Return to the 350 degree oven and bake for 25 more minutes.
Cool completely in pan before cutting.

NOTE:  The pecan pie bar crust does not stick to the pan, but around the edges of the topping, it does tend to stick. To combat that, I lined my 9" x 13" glass dish with foil. I didn't grease the bottom, but I greased the sides of the foil a little (the new Reynolds Easy Release foil would be good for this). 

Also, let the foil ends hand over the edges of the baking dish a little bit so you can grab the foil "tails" and lift the baked (and cooled) bars out of the pan for easier cutting.

When the bars are completely cool, just lift the whole thing out of the pan and onto a cutting board.They are rich, so cut the bars small.

Thursday, 19 May 2011

PECAN PIE MINI-MUFFINS

These little gems taste just like a Pecan Tassie. They are made out of 6 every day ingredients and are great with a morning cup of tea, or the lunch box or a long car ride (not at all messy). These are Hubby's "new" favorite snack. Store covered.
1 cup light brown sugar
½ cup flour
2 eggs
2/3 cup soft butter
½ teaspoon vanilla
1 cup chopped pecans

Preheat oven to 350°. Grease and flour a mini muffin pan (or spray with a cooking spray that has flour in it, like Bakers Joy). Mix the wet ingredients in a medium size bowl and then stir in the dry ingredients, its just that simple!!

Mix long enough to just get the batter smooth. Make sure you use the MINI muffin pans (not cupcake size). Fill cups with one tablespoon batter each (makes 24). Bake for 17 minutes.

NOTE: Dusting pan with flour is important.

NOTE: My oven cooked these in 16 minutes.

NOTE: Taking these out of the pan is the only (mildly) tricky part of this recipe. Letting the muffins cool for 2 or 3 minutes before you try to remove them from the pan will help a lot, but don't leave them in the pan longer than than that, since they will get harder to remove from the pan as they cool.

NOTE: Slide a  thin knife gently around the sides of the muffins, then gently lift them out using the knife.

NOTE: If you keep these muffins covered well, they will stay soft for a long time (they tend to get a little crispy around the edges if left out in the air).

Thursday, 18 November 2010

FUDGE FILLED PEANUT BUTTER COOKIES

This impressive (but very simple) cookie will be great for the holidays. It consists of a sweet peanut butter cookie shell, filled with a rich fudge filling. When you first make the cookies, the filling is soft enough to pipe (or you can spoon it into the shell). However, after it completely cools, the filling is the consistency of a soft fudge. They are delicious, and look so pretty!!!
 ½ cup butter (room temperature)
½ cup creamy peanut butter
½ cup white sugar
½ cup brown sugar
1 egg
1 teaspoon vanilla
.
Cream the above ingredients together until smooth, then add:
.
1¼ cups all purpose flour
¾ teaspoon baking soda
½ teaspoon salt
.
Beat everything until very smooth. Shape dough into 1" balls (makes about 4 dozen) and place each ball into the bottom of a mini muffin tin (ungreased) like this:
Bake in a preheated 375 oven for about 10-11 minutes or until they look like this:

After they are baked, find something in your kitchen that has a round end that you can use to press down on the center of these HOT cookies (to make the shell shape). I used the large rounded end of my mortar and pestle, but anything will work. Just be careful not to press so hard that you break through to the bottom. They should look like this:
Let these cookies cool (in the pan) for 10 minutes, then use a thin (but pointed) paring knife to assist you in lifting the cookie shells out of the pan (they come out pretty easy). Cool shells on a baking rack.
.
FILLING
1 cup milk chocolate chips
1 cup semi-sweet chocolate chips
1 (14 ounce) can sweetened condensed milk (not evaporated)
1 teaspoon vanilla extract
.
Melt the chocolate in a double boiler over simmering water (I just used the microwave). With an electric mixer, beat in the sweetened condensed milk and vanilla until smooth. Fill the cookies.
The fudge dries to the touch after it is completely cooled.

Monday, 25 October 2010

PUMPKIN - CRANBERRY BREAD (the best)

If the rating system for this recipe was 1 to 5 stars; I would rate this a 10. It is absolutely delicious and will be perfect for your holiday table!! It is very easy to make (doesn't even take an electric mixer) and yet it is unique enough for gift giving. I hope you try it, it is SO GOOD... extremely moist, total comfort food!!! Preheat your oven to 350, and grease and flour two 9" x 5" loaf pans. Set out two large bowls. In the first one mix:

3 cups all purpose flour
3¼ teaspoons ground cinnamon
¾ teaspoon ground nutmeg
¾ teaspoon ground ginger
¼ teaspoon ground cloves
2 teaspoons baking soda
1½ teaspoon salt


In the 2nd bowl, mix:
3 cups granulated sugar
(1) 15 ounce can pure pumpkin (see note)

4 eggs
1 cup vegetable oil
½ cup orange juice (see note)

2 cups fresh or frozen cranberries (see note)
.
Whisk the first bowl (with the flour in it)until the dry ingredients are well mixed. Whisk the 2nd bowl (with the pumpkin in it) until WELL mixed and oil is completely incorporated. Pour the wet into the dry and mix with spoon just until moistened. Stir in cranberries gently.
.
Pour batter into prepared loaf pans. Bake 60 to 65 minutes (my oven took 70 minutes). Cool (in the pans) for about 10 minutes, then turn them out. Wrap the hot bread IMMEDIATELY in plastic wrap, covering tightly. Let the breads cool completely in the wrap.


NOTE: Make sure you use a 15 ounce can of plain packed pumpkin and NOT pumpkin pie filling (big difference).

NOTE: Recipe calls for ½ cup of orange juice, which I didn't have, so I used pineapple juice instead.

NOTE: Wash and sort your cranberries. Try to use the darkest berries. Make sure they are thawed out before mixing into batter.

NOTE: It is OK to put the plastic wrap on the hot bread as soon as it comes out of the pan. This forces the moisture back into the bread as it cools.

NOTE: My oven took 70 minutes to cook these loaves. Use the toothpick test to determine doneness.

Wednesday, 12 May 2010

PEANUT BUTTER BLONDIES (and a thank you)

These peanut butter blondies are dense, moist and packed full of peanut butter flavor; they are the consistency of a good brownie and would make an excellent addition to any lunch box, bake sale or weekend treat served with a big glass of cold milk.
½ cup peanut butter
1/3 cup butter (room temperature)
2/3 cup white sugar
½ cup packed brown sugar
2 eggs
2 teaspoons vanilla extract
1 cup all purpose flour
1 teaspoon baking powder
¼ teaspoon salt
.
In a medium mixing bowl, cream the peanut butter and butter together; beat in the sugars, eggs and vanilla just until well mixed. Add the flour, baking powder and salt and mix just until everything is well mixed.
,
Bake in a greased 9" x 9" baking pan at 350F for 30 to 35 minutes or until top springs back when lightly touched (my oven took 34 minutes). Frost and sprinkle with chopped peanuts. Cool before cutting.
.
PEANUT BUTTER FROSTING
½ cup peanut butter
1 teaspoon vanilla extract
2 cups powdered sugar
4 to 5 tablespoons milk
Warm the peanut butter in the microwave just until it gets very soft, then whip everything together, starting with the lesser amount of milk and adding more if necessary.
Thank you very much for all of the warm birthday sentiments. Your kind and generous words made my (potentially traumatic) 60th birthday a lot easier for me. Thank you friends!!

Monday, 22 March 2010

SHORTBREAD MELTAWAY COOKIES (and hubbies new hobby)

My Hubby has started a new hobby...wood turning and I couldn't be happier. I am quickly accumulating beauties like the piece below which is made out of birch (he harvests wind-fallen birch and spruce trees from the forest behind the house). He used to teach college level hand thrown pottery, so I'm guessing some of those skills have carried over to his new wood turning attempts. In any case, I am very happy with the results.

Today's Shortbread Meltaway Cookies are quick, easy and they literally do, melt in your mouth.
.
1 cup all purpose flour
½ cup cornstarch
½ cup powdered sugar
¾ cup butter (room temperature)
1 teaspoons vanilla
.
Cream the butter, in a stand mixer, until smooth. Add the rest of the ingredients and beat until the dough is well mixed and comes away from the sides of the bowl.
.
Roll dough into one inch balls and roll them in sugar. Place on ungreased cookie sheet and lightly press down with a fork. Bake at 350F for 10 to 12 minutes or until the outside edges of the cookie start to turn golden. Makes about 3 dozen cookies.


Next is another view of my newest birch "pretty". I haven't decided what to do with these yet, but I'm sure something will come to me. He has plans to do a big salad bowl next, I'll let you know how it comes out. I love the grains in the wood.


Sunday, 14 March 2010

(TWIX COPYCAT) CHOCOLATE-CARAMEL-SHORTBREAD COOKIES

A few days ago, I spotted an intriguing recipe on someones web page, however, in my haste I didn't take note of who's page it was (thank you to everyone who helped with page suggestions). Instead I found a similar recipe and gave it a try (with a couple minor changes). My first "taste testers" were a group of old grizzled snowmachine groupies in Hubby's shop and the treats disappeared instantly.


Next, I made some to take to our granddaughters 14th birthday party; they were a hit there as well. It is unfortunate that these cookies are called Twix cookies, because they are vastly better than ANY Twix candy bar I've ever eaten. There is a sweet crispy shortbread cookie base, topped with a nice thick layer of caramel made from sweetened condensed milk, and then they are topped with your favorite flavor of melted chocolate. These cookies are totally addicting and the recipe is going straight into my FIVE STAR recipe folder.

COOKIE BASE
1 cup cold butter
2 generous cups all purpose flour
heaping ½ cup brown sugar (I used dark)


Put all the of cookie ingredients into the food processor and pulse until it just starts to bind together. It won't go completely together, but if you watch it while you pulse, you will see the consistency change and small "clumps" appear.


Press this mixture into a parchment paper lined 9x13 baking dish (I left the ends of the parchment paper long, so I could grab them and lift the final product out of the pan for easier cutting). Bake in preheated 350F oven for 20-25 minutes or until edges are light golden. (see note below)

While the crust is baking, make the caramel filling:
.
¾ cup butter
generous ½ cup brown sugar (I used dark)
3 tablespoons Karo corn syrup
14 ounce can sweetened condensed milk (not evaporated)
.
In a heavy bottomed saucepan, mix all of the caramel ingredients. Heat (and stir constantly) on medium high heat until it comes to a boil. At first, the melted butter will sort of float on top, but as it cooks (and you stir) it will incorporate. See note below for burner temperature suggestions. Reduce heat and simmer for 6-8 minutes, stirring constantly. Pour over pre-baked cookie base. Refrigerate until caramel layer is cold and firm to the touch.
.
Melt 12 ounces of your favorite flavor chocolate (I used milk chocolate) + a teaspoon of butter. Stir until smooth and pourable (I just melted mine in the microwave for 60 seconds). Spread over cooled caramel and return to the fridge to let the chocolate set (I actually speed set mine in the freezer).
.
Cut into small squares and serve. These are really rich, so I cut them into squares just a little bigger than 1" x 1".
.
NOTE: The recipe calls for "2 generous cups of flour"...whats up with that? I measured my flour and sugar in the standard way then added a tablespoon extra per cup. I'm not sure if that is what the original recipe meant, but it worked well for me.
.
NOTE: The ingredient amounts for the cookie crust are way off track in the original recipe. I only used about 2/3 of the crumbs for the cookie base and it was perfect. If you like a thick cookie base, use all of the crumbs.
.
NOTE: My burner settings go from 1 to 10. I brought the caramel ingredients up to a boil at setting 8 (medium high), then quickly turned it down to setting 5 (medium) for a couple of minutes, and finally ended up on setting 3 (low); cooking for a total of 6 minutes. The caramel will be pretty thick, so keep reducing the heat until the caramel. The caramel traps and holds the heat for a long time, so start turning down your burner before it gets to that wild-boil stage.
.
NOTE: I found this recipe (dated 2008) on a web page called The Domestic Side of Life.